Finally I fixed some more stuff so I might as well dig this up from the past, but also to shame myself in how long its taken me to do some of the jobs (though to be fair, I was out of action for 2 years growing new bits during it after a big accident in my landrover 101...)
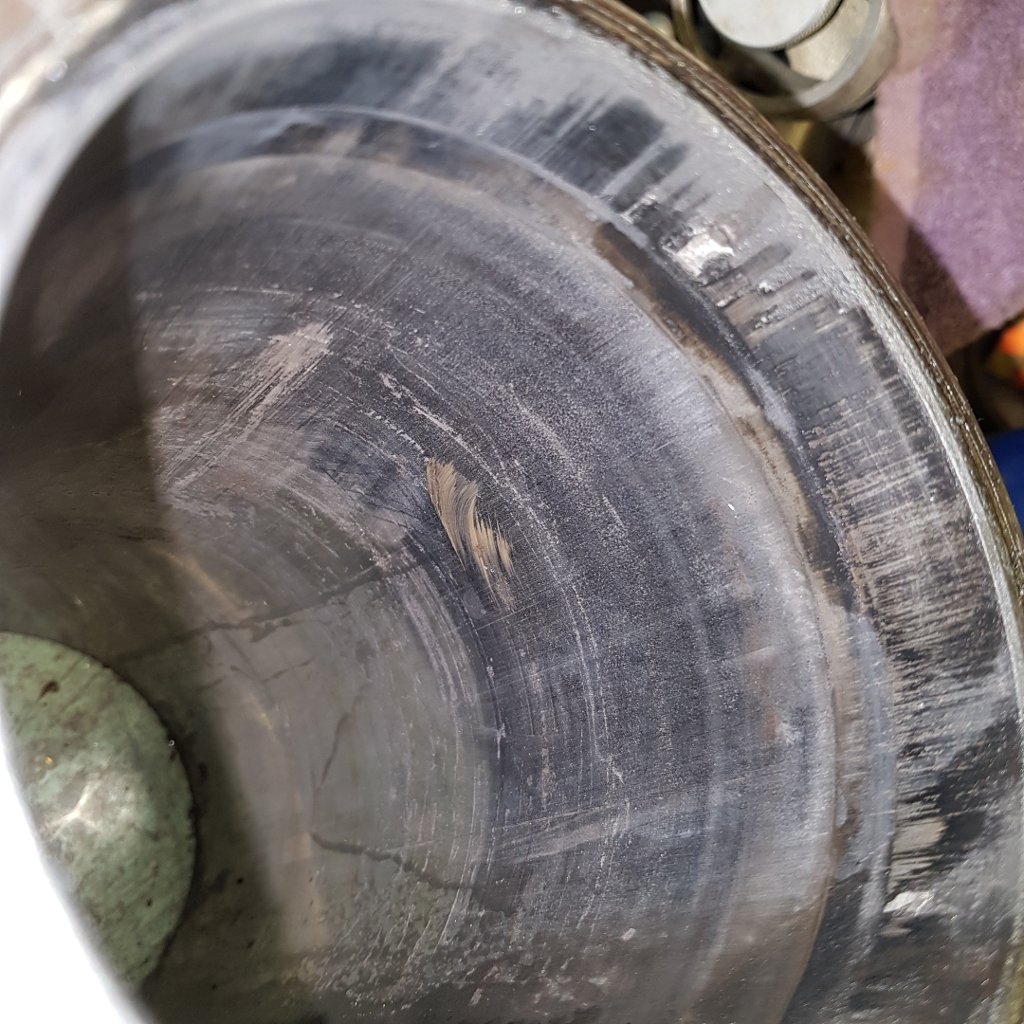
As elsewhere on the board I extracted #3 after a really low compression reading, but reposting here to just keep it in one place now.
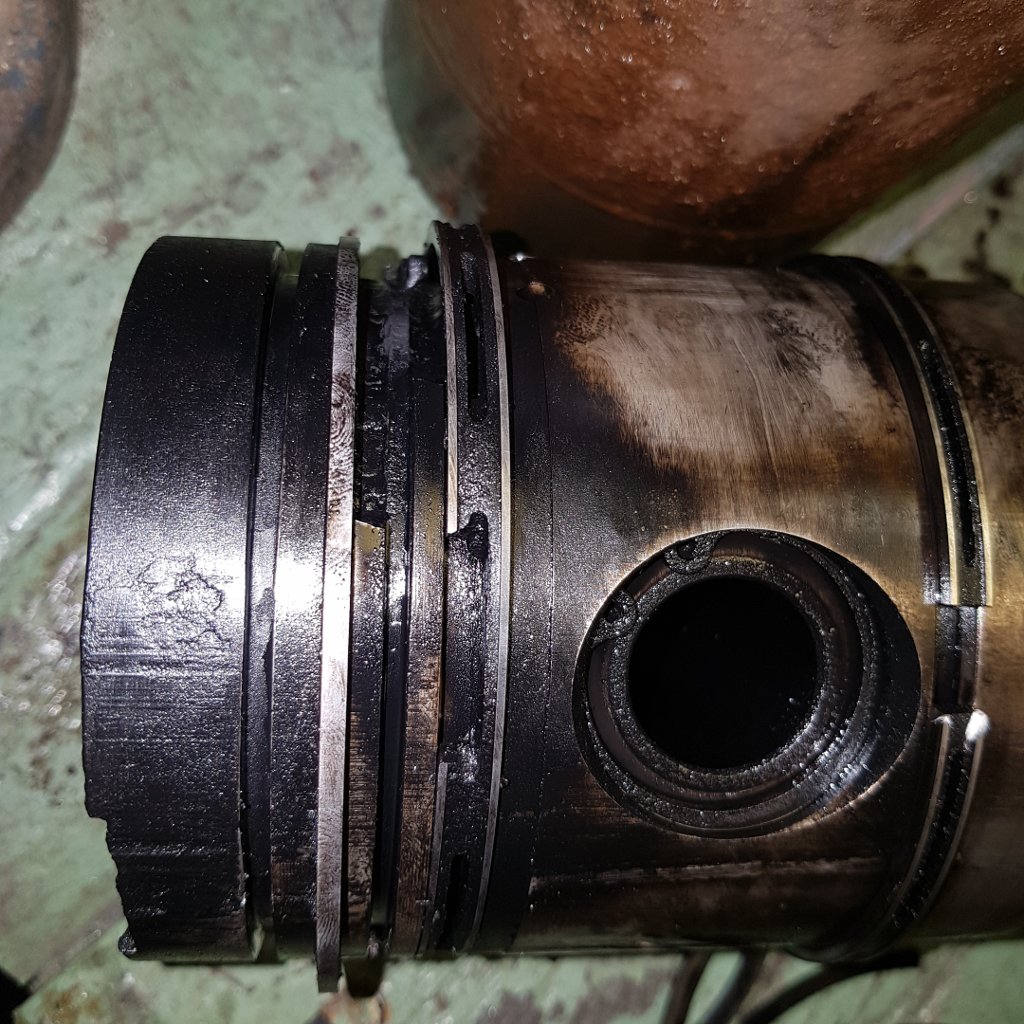
Original URL: http://gallery.pipandphil.com/Vehicles/workshop/jcbpiston1.jpg
Liner to match
Original URL: http://gallery.pipandphil.com/Vehicles/workshop/jcbliner.jpg
New liner in, after some shennanigans with cap marking being altered
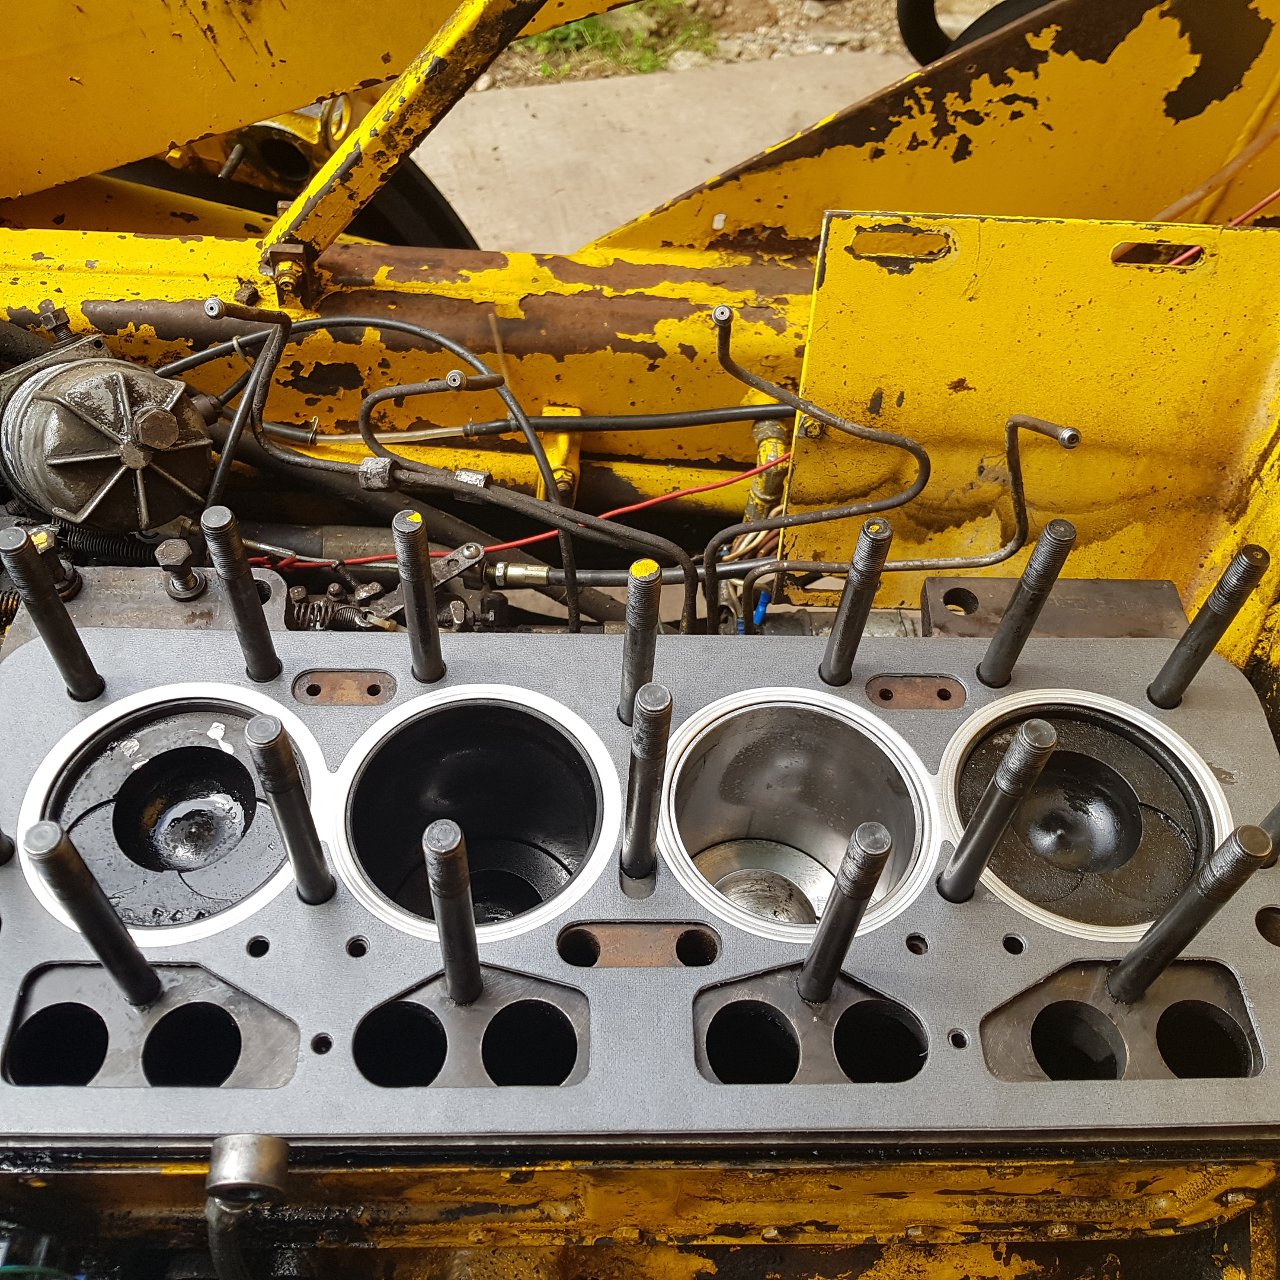
Original URL: http://gallery.pipandphil.com/Vehicles/workshop/jcb_newpot.jpg
Head back on, painted the rocker cover and I've bought a replacement rocker cover cap because one of the legs has fell off the old one. I know its the wrong shade of yellow for the machine, bu its better than rust.
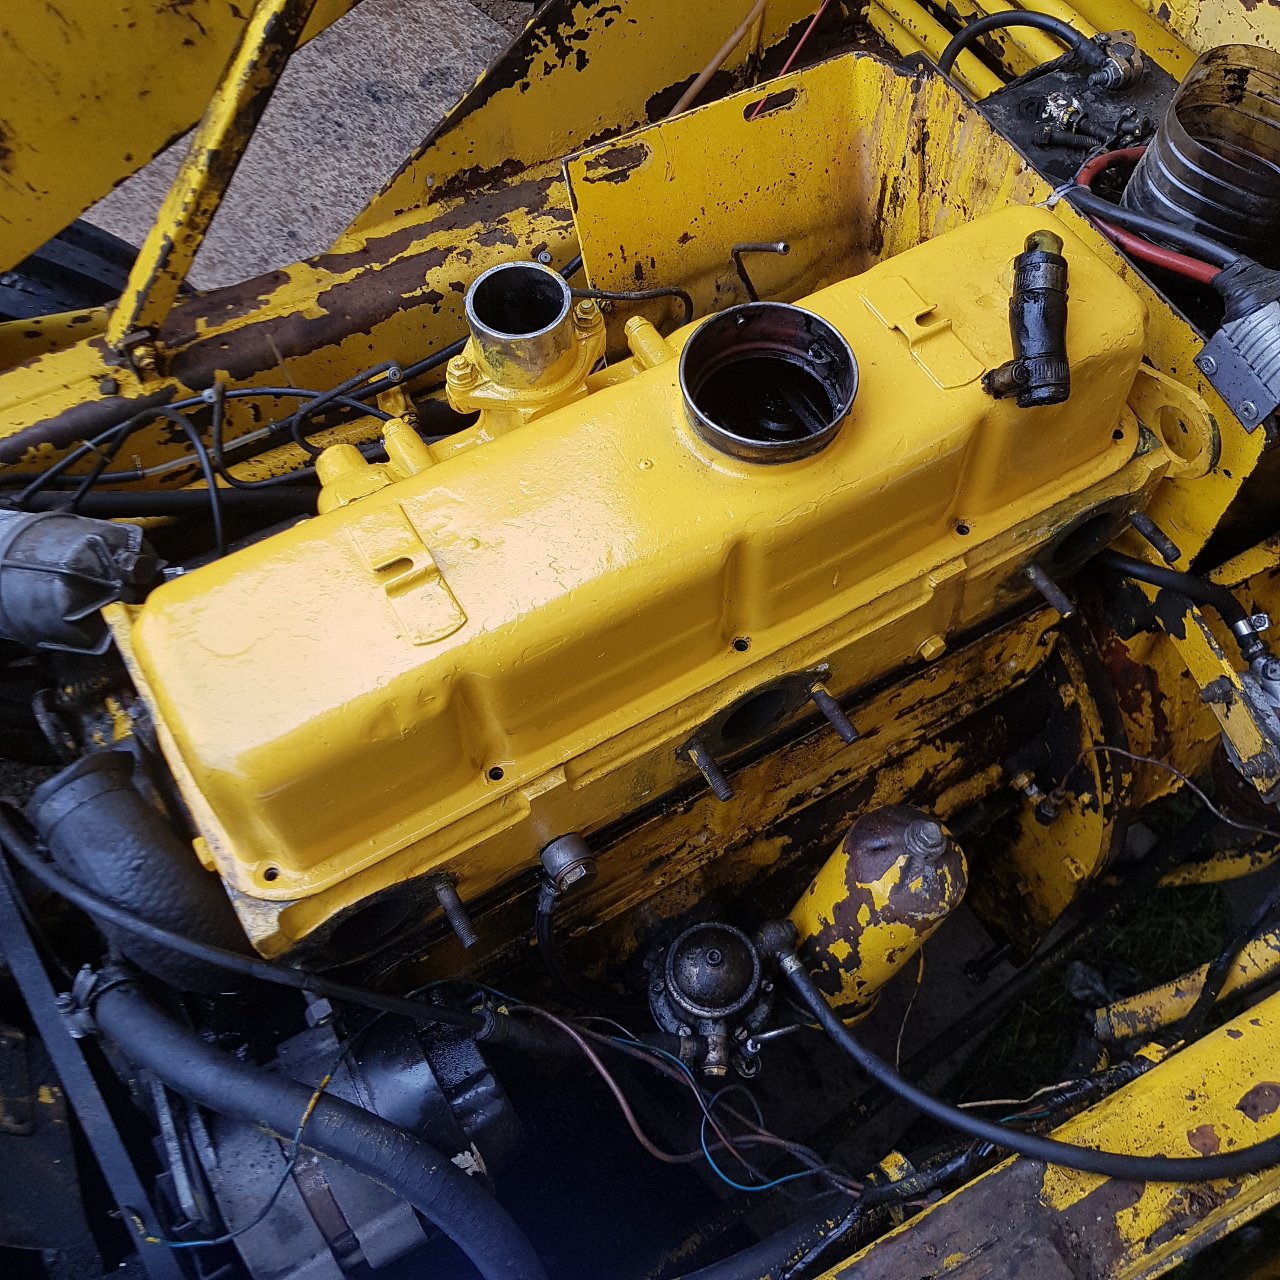
Original URL: http://gallery.pipandphil.com/Vehicles/workshop/jcb_headon.jpg
I took off the rad at the suggestion of someone here and backflushed it, and got all the grunge off the bottom with the steamer, then pressure tested it as I have always been suspicious of the top tank as its damaged by some idiot in the past standing on it. And it was leaking between the filler neck and radiator top tank, and the filler neck itself was twisted. So I bought a replacement neck off ebay and sweated the old neck off.
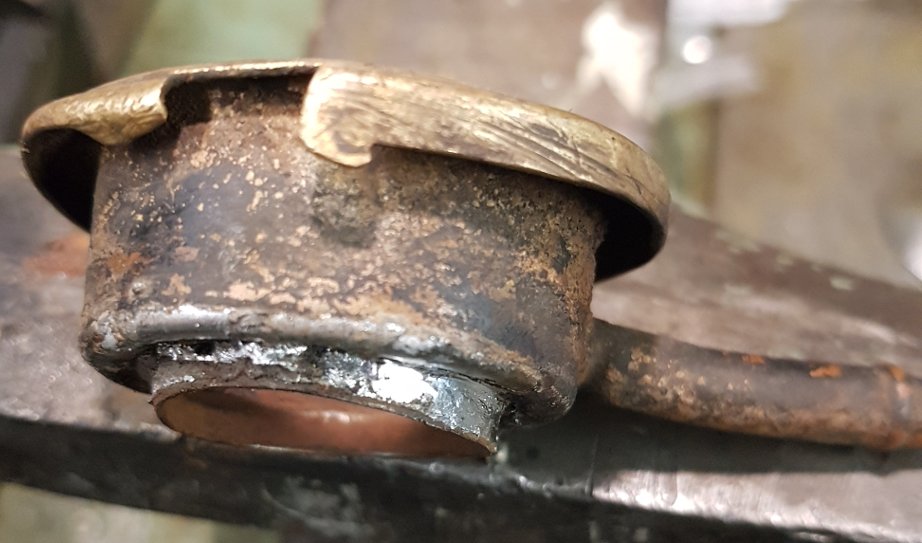
Original URL: http://gallery.pipandphil.com/Vehicles/workshop/jcb_rad_oldneck.jpg
Its oval too, you can just make this out.
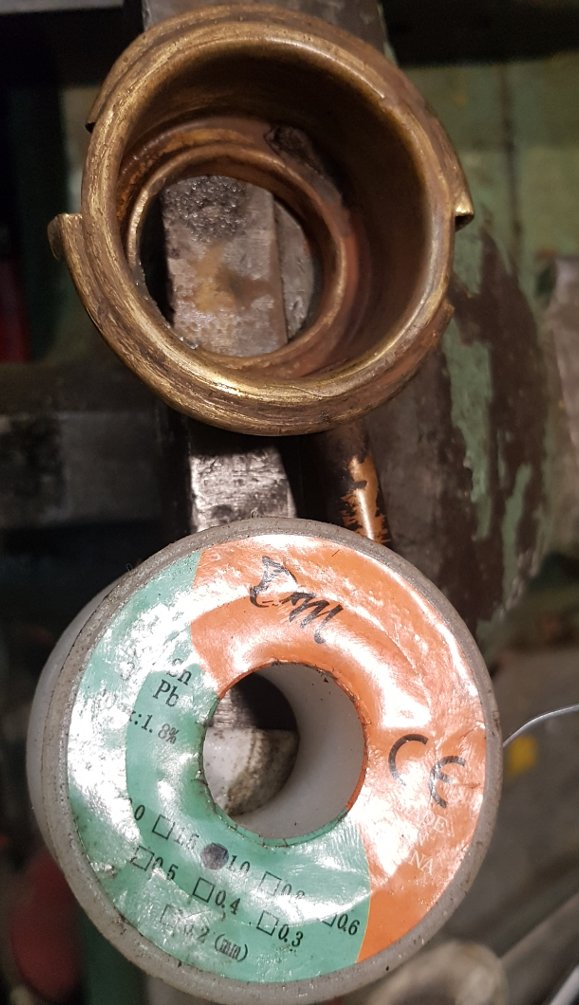
Original URL: http://gallery.pipandphil.com/Vehicles/workshop/jcb_rad_oldneck2.jpg
Soldered new neck in, and holding at 5psi. Yes my "testing" rig is bits of old inner tube wrapped round the spigots and hose clipped to stop leakage, but it works and it was free. I painted it matt black after this to keep corrosion at bay and its back in the machine now.
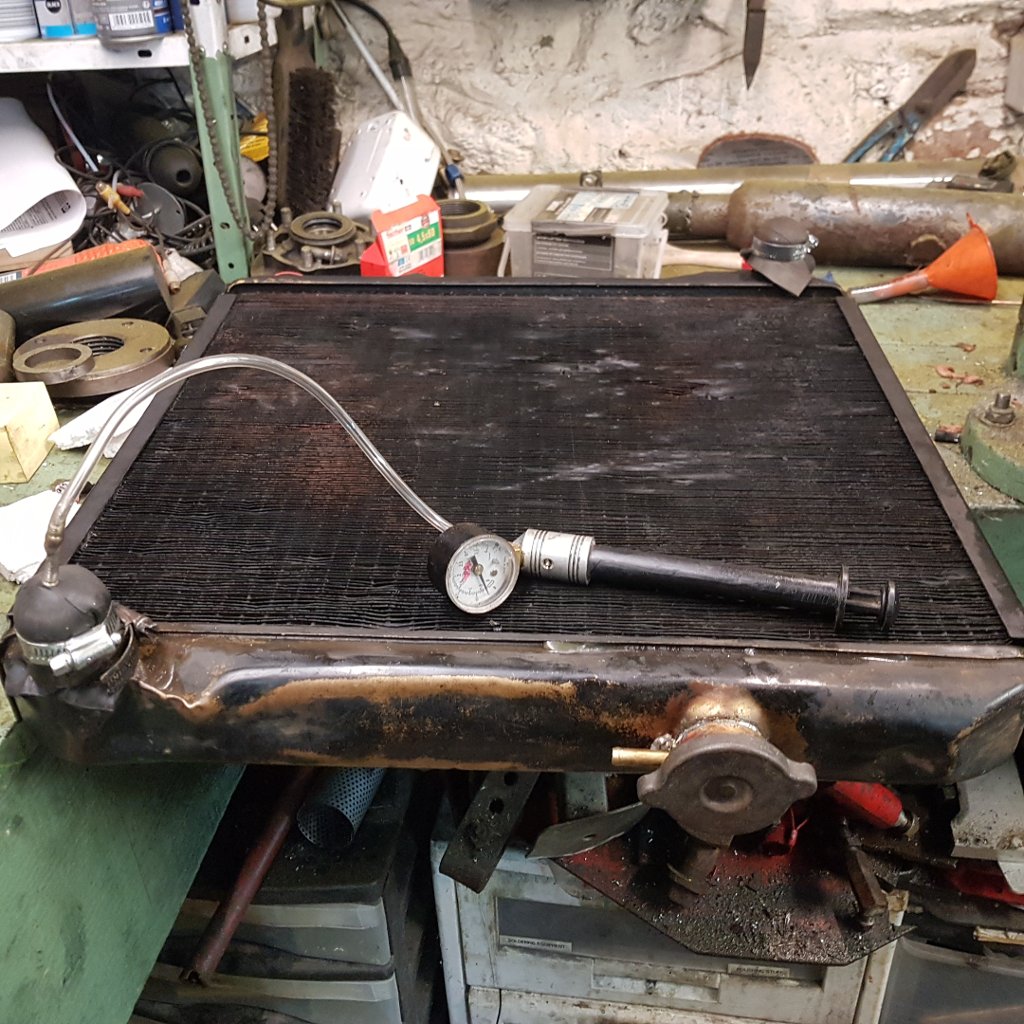
Original URL: http://gallery.pipandphil.com/Vehicles/workshop/jcb_rad_testing.jpg
I picked up the correct 3c canister air filter off ebay to replace the transit pancake housing it had on it, and bead blasted it and painted it and put new filters in it, but no photo of that. I can't find anyone selling a intake hose to connect it the manifold so I'll have to make something to suit.
Besides that, I replaced the tacho drive box, and ordered a new tacho cable, vicary have them in stock for the 3c iii if anyone is searching still, and some other seller on ebay who wanted double the price for postage etc. Now waiting for more stuff to arrive & I have next week off to get some more stuff done if it turns up.
carnage 3ciii
-
- Moderator
- Posts: 8677
- Joined: Sun Aug 05, 2007 8:36 pm
- Real name: Jeremy Rowland
- Has thanked: 1873 times
- Been thanked: 1692 times
-
- Posts: 366
- Joined: Sat Aug 11, 2007 11:49 pm
- Real name: dylan jones
- Location: South cheshire
- Has thanked: 40 times
- Been thanked: 33 times
- Flag:
-
Topic author - Posts: 415
- Joined: Thu Mar 12, 2009 10:35 am
- Real name: Phil F
- Location: France
- Has thanked: 18 times
- Been thanked: 108 times
- Flag:
Re: carnage 3ciii
Well, its together. Air filter I have worked out is the wrong one for my machine, it should have the one with the filter connection at the rear, but despite the strange shape fabricated elbow (welded together from some intercooler pipework bends) and two flexible sections, it seems to be ok. The exhaust is homemade and not at all fitting the appearance, but its better than a rotten original with holes in and it makes the gas go in the right direction and removes enough of the noise. Another thing which is bothering me is the fan shround has no lip, its effectively just a flat plate with a fan shaped hole in it and I know that kills fan efficiency, did they have a shroud lip which fitted outside the fan? was it part of the mesh belt cover affair (thats missing also). Also the front "bonnet" for the section in front of the radiator is missing also, I think that wont help cooling so I'll see about making one.
Original URL: http://gallery.pipandphil.com/Vehicles/workshop/jcb_engine_together.jpg
It now has throttle and engine stop brackets to replace the mess I got it with after squinting at the sole picture in one of the parts books.
I made up two substantial L brackets to screw onto the end of the dpa pump where the original part mounted, and turned up blocks with threaded posts on them & tapped the throttle cable one to suit its threads (bizarrely m10 outer irrc, and 7/16 AF inner!) and used nylocks underneath, so the blocks can pivot to stay aligned to the pulling forces rather than ragging the cable on the bracket sides. And it now has a proper stop lever in the cab. And it goes back on its own. Luxury. I probably should have used thinner steel but it works.
Original URL: http://gallery.pipandphil.com/Vehicles/workshop/jcb_throttlekillbracket.jpg
More fettling on the electrics again & machine refused to start off the key, the problem was traced to the "new" ignition switch fitted being intermittent & the neutral starter inhibitor switch on the top of the gearbox being bad. I now have that jumpered with a link, but I'll see about changing it before it tries to run me over when starting it one day. The ignition keyswitch I've ordered a genuine nos lucas one instead of generic rubbish.
Running it up proper, I had to back off the low rpm stop screw on the top of the pump before it would idle slow enough for my liking (600rpm) so I see that as a good sign as it must have been carrying the bad cylinder since before the pump was rebuilt when I first got it, but I warmed it up and now 3 of 4 injector sleeves leak water. Which although not disturbed perhaps my radiator no longer leaking is now putting pressure on other weak spots and its just been there all along. I will find a suitable rawl bolt and expand them/replace them if it doesn't. And I put my foot on one of the front wheel rims slipping off a step ladder and tore a valve out of the tube, so now I have to put a new tube in too so that'll be sunday's private gym workout with some tyre levers in the yard.
Finally the tacho now works, but is really lazy. I have a plan involving some thin lubricant if it doesn't free up in a few more minutes running. But, I'm pleased its even bothering to wave the needle. That's progress.
-
Topic author - Posts: 415
- Joined: Thu Mar 12, 2009 10:35 am
- Real name: Phil F
- Location: France
- Has thanked: 18 times
- Been thanked: 108 times
- Flag:
Re: carnage 3ciii
Well small steps forward, the water pump was leaking out the telltale during warm up, so replaced it.
Waiting for new spill pipes and seals for the injectors from a order placed just under a month ago now so haven't pulled to fix the injector sleeve leaks as will do all that as same job. A new dash pressure gauge for the torque converter has arrived but the line up to the dash is so brittle I'm replacing the whole line before it ruptures so again on hold waiting for imperial sized lines to arrive in the post.
But, a new leyland/marshall starter none-neutral inhibitor switch arrived along with a genuine lucas keyswitch so they have both gone on. And once the switch cover on the back of the gearbox was removed and the packed dirt extracted it was much easier to spot the defect in the original (though I did some of the fresh marks extracting the remains).
Original URL: http://gallery.pipandphil.com/Vehicles/workshop/jcb_neutral_sidebyside.jpg
At first I fitted a copper o-ring to seal the switch up to the box out of habit, but the thickness of it affects the operation so used just a very light smear of rtv where the o ring seated on the sensor and screwed it fully home without the copper washer.
-
Topic author - Posts: 415
- Joined: Thu Mar 12, 2009 10:35 am
- Real name: Phil F
- Location: France
- Has thanked: 18 times
- Been thanked: 108 times
- Flag:
Re: carnage 3ciii
Ah well, another few hours on it, all fine. Turns it off after moving it out the work area so we can get the tractor in to fix a leaking radiator as we need tractor urgently to cut grass, and turn key to drive it back and clunk. Think battery is flat, put charger on, nothing, loose the injectors and all the cylinders have water in and the brand new oil is contaminated. If someone passing offered me a couple of hundred for the scrap value it would be gone right now.
I'm going to abandon it where its parked up in disgust until I work out if I'm still stupid enough to persist with it or not.
-
- Moderator
- Posts: 8677
- Joined: Sun Aug 05, 2007 8:36 pm
- Real name: Jeremy Rowland
- Has thanked: 1873 times
- Been thanked: 1692 times
Re: carnage 3ciii
Phil, having a quick browse through what you have said above I suspect the injector sleeves are the culprit; I don't know if they can be changed in-situ on these engines or not, but for all the cylinders to have water in them then this is where I'd be looking. It's one of those aggravating issues that raise their heads from time to time but after all the hard work you have put in up to now it would be a real shame not to sort this issue now. Wishing you better luck with it.
Jeremy
Jeremy
-
Topic author - Posts: 415
- Joined: Thu Mar 12, 2009 10:35 am
- Real name: Phil F
- Location: France
- Has thanked: 18 times
- Been thanked: 108 times
- Flag:
Re: carnage 3ciii
Walking away and returning with a hangover always puts things in perspective better and to be logical, it has to be the head gasket failed for the oil to become contaminated. I'll order both a head gasket and the newer design injector sleeves that don't need rolling on install as the sleeves need sorting out anyway.
Possibly the new cylinder sleeve I have fitted has settled further into the block with some heat cycles. I'm not relishing having to take the skid pan/sump/piston back out to reset the sleeve height but if it has settled, that's what has to be done.
-
- Moderator
- Posts: 8677
- Joined: Sun Aug 05, 2007 8:36 pm
- Real name: Jeremy Rowland
- Has thanked: 1873 times
- Been thanked: 1692 times
Re: carnage 3ciii
MrF wrote:Walking away and returning with a hangover always puts things in perspective better and to be logical, it has to be the head gasket failed for the oil to become contaminated. I'll order both a head gasket and the newer design injector sleeves that don't need rolling on install as the sleeves need sorting out anyway.
Possibly the new cylinder sleeve I have fitted has settled further into the block with some heat cycles. I'm not relishing having to take the skid pan/sump/piston back out to reset the sleeve height but if it has settled, that's what has to be done.
Phil put some Loctite on the injector sleeves when you change them.
Jeremy
-
Topic author - Posts: 415
- Joined: Thu Mar 12, 2009 10:35 am
- Real name: Phil F
- Location: France
- Has thanked: 18 times
- Been thanked: 108 times
- Flag:
Re: carnage 3ciii
For sure, there's what looks like a good fitment guide at the supplier I'm going to order the sleeves & some other bits from :-
https://www.tractorspareparts.co.uk/ima ... ectors.pdf
And my spare filter/spill pipe olives/tube turned up today from somewhere else. Only took a entire month but I won't mention their name as it seems like it was royal mail's fault from the franking on the jiffybag. But still, they have a online ordering system that just fires out a "your order has been dispatched" email with no further info so I think I'll give them a miss in future.
Also, the 4/98 oil cap which is "unique to the 4/98" is actually the same size as a landrover series 2/2a/3 external type fuel cap part number 277260. Mine has arrived and its fits nicely.
Though the landrover part does have a flat bit on top to make turning the cap easier to turn so not a completely authentic replacement, it was quarter of the price of the sole supplier I can find with the "correct" one. And it comes with a length of bog chain too.
Who is online
Users browsing this forum: No registered users and 12 guests